Best Crimping Tool for PEX: Top Picks for DIY & Pros
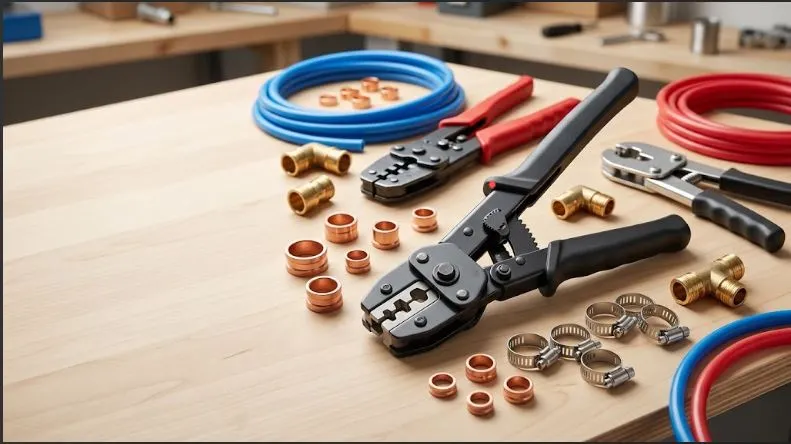
For most homeowners and DIYers doing occasional repairs with copper crimp rings, the IWISS iCrimp F1807 all-in-one kit is the easiest tool to recommend. it covers 3/8-inch through 1-inch tubing, includes a cutter and go/no-go gauge, and doesn’t require buying separate jaws later. Working plumbers who swap pipe sizes all day tend to prefer a multi-head kit like the Apollo PEX Multi-Head Crimp Tool, and anyone using stainless-steel cinch rings instead of copper rings needs a dedicated cinch tool, not a crimper at all.
The right tool depends on five things: which connection system your fittings use, which tubing sizes you’re working with, how often you’ll use the tool, how tight your workspace is, and your budget.
Before you buy anything, understand this distinction:
- A crimp tool compresses a copper crimp ring around the tubing and a barbed fitting.
- A cinch (clamp) tool tightens a stainless-steel cinch clamp around the tubing and fitting instead of a ring.
- An expansion tool stretches the tubing and fitting together using a cone-shaped expander head — it doesn’t crimp anything at all.
These are three different connection systems, and a tool built for one won’t work on the other two. If you’re not sure which system is already installed in your home, check the fitting: a copper ring or stainless clamp visible at the joint tells you which tool you need. If you see a plastic or brass expansion-style fitting with no visible ring or clamp, you likely have an expansion system.
| Tool | Best For | Connection Type | PEX Sizes | Key Feature | Price | Check Price |
|---|---|---|---|---|---|---|
| IWISS iCrimp F1807 Kit Best Overall | Best overall / DIY all-in-one | Copper crimp ring | 3/8″, 1/2″, 3/4″, 1″ | Cutter, gauge, and decrimp tool included | Budget–Mid | Check Price |
| IWISS Ratcheting PEX Cinch Tool | Best budget option | Stainless cinch clamp |
3/8″ to 1″ (clamp-dependent) |
Single ratcheting tool, no jaw swaps | Budget | Check Price |
| Apollo PEX Multi-Head Crimp Tool | Best for pros / multi-size | Copper crimp ring | 3/8″, 1/2″, 3/4″, 1″ | Interchangeable heads, high leverage | Mid | Check Price |
| IWISS iCrimp Angle Head Kit | Best for tight spaces | Copper crimp ring |
1/2″, 3/4″ (typical) |
Angled jaw for confined access | Mid | Check Price |
| RIDGID Traditional Manual Crimp Tool | Best dedicated single-size pro tool | Copper crimp ring |
One size per tool (1/2″, 3/4″, or 1″) |
Built-in go/no-go gauge, calibration screw | Mid | Check Price |
| Battery-Powered PEX Crimp/Press Tool | Best for high-volume professional use | Copper crimp ring or press-fit, depending on model | Typically up to 1″ | One-handed operation, reduced hand fatigue | Higher | Check Price |
Best Overall: IWISS iCrimp F1807 All-in-One Kit
Best for: DIYers and small-scale plumbers who want one kit that handles nearly every residential job.
Why we recommend it: It bundles the crimper, four jaw sizes, a tubing cutter, a crimp-removal tool, and a go/no-go gauge in a single case. That combination covers most residential repair and remodel scenarios without a second purchase, and the included gauge lets you verify each connection on the spot.
Key Specifications
Important features and included accessories at a glance.
Pros
Where this PEX crimping kit stands out
- Complete residential setup: Includes the main tools and accessories needed for a typical residential PEX crimping project in one case.
- Tool-free jaw changes: Interchangeable jaws can be swapped without needing additional tools, making it easier to move between PEX sizes.
- Useful extras included: The go/no-go gauge and decrimping tool can reduce the need to purchase separate accessories.
Cons
Things to consider before buying
- More hand effort: Because it is a manual ratcheting tool, making larger 3/4″ and 1″ connections can require noticeably more hand effort than using a battery-powered crimp or press tool.
- Bulkier in tight spaces: The interchangeable-jaw body is larger than some dedicated single-size or angled crimping tools, which may make access more difficult inside cramped plumbing cavities.
IWISS Ratcheting PEX Cinch Tool: Specifications, Pros & Cons
The IWISS Ratcheting PEX Cinch Tool is a simple, budget-friendly option for DIYers who use stainless-steel cinch clamps. Unlike multi-size crimp tools, it uses a fixed jaw design, so there are no interchangeable jaws to manage.
Why We Recommend It
This tool keeps PEX cinching simple and affordable. Its single ratcheting design eliminates the need to swap jaws, which makes it easier for occasional DIY use. The ratchet also stays engaged until the clamp tab is properly pinched, helping reduce the chance of an incomplete cinch.
Key Specifications
Pros
- Low cost: More affordable than many complete multi-size PEX crimp kits.
- Simple operation: The fixed-jaw design means there are no jaw changes to slow down a repair.
- Easy visual inspection: Stainless-steel cinch clamps make it easy to see the finished connection after installation.
Cons
- Limited compatibility: Designed for cinch-style clamps and fittings, not copper-ring crimp connections.
- Few included accessories: A pipe cutter and other accessories may need to be purchased separately.
- Requires hand force: Larger clamp sizes can require noticeable hand pressure during installation.
- Not a universal PEX tool: It is not suitable if your project requires expansion fittings or traditional copper crimp rings.
The IWISS Ratcheting PEX Cinch Tool is a strong budget choice if you already use stainless-steel cinch clamps. Its fixed-jaw design keeps the tool simple and affordable, making it especially useful for occasional DIY repairs. Just make sure your fittings and clamps are designed for the cinch connection system before buying.
Best Professional / Multi-Size PEX Crimp Tool: Apollo PEX Multi-Head Crimp Tool Kit
Best for: Plumbers and remodelers who move between pipe sizes on the same job, day after day.
Why we recommend it: The interchangeable-head design lets you swap between 3/8″, 1/2″, 3/4″, and 1″ jaws in seconds using two hex bolts and the included wrench, instead of carrying separate dedicated tools. Apollo is also a major PEX fitting manufacturer, so pairing their tool with their fittings keeps compatibility straightforward.
Key specifications
- Connection type: copper crimp ring (ASTM F1807 style)
- Compatible sizes: 3/8″, 1/2″, 3/4″, 1″ (interchangeable heads)
- Tool type: manual, high-leverage crimper
- Jaws: interchangeable, swapped with two hex bolts
- Go/no-go gauge: included
- Cutter: not included
- Crimp-removal function: not included
- Calibration: adjustable via included wrench
Pros
- Genuine multi-size versatility without buying separate tools
- High mechanical leverage makes larger crimps less physically demanding than a basic fixed-jaw crimper
- Durable plastic case keeps heads and gauge organized between jobs
Cons
- No built-in cutter, so you’ll need a separate PEX tubing cutter
- Heavier and bulkier than a single-size manual crimper, which can matter in very tight cavities
- Higher upfront cost than a basic single-size tool
Best Compact PEX Crimp Tool: IWISS iCrimp Angle Head Kit
Best for: Connections made inside cabinets, wall cavities, and other restricted spaces where a standard straight-jaw crimper won’t fit or swing.
Why we recommend it: The angled jaw head is designed to reach connections that a standard in-line crimper physically can’t approach at the correct angle, which matters more in remodel and repair work than in open new-construction runs.
Key specifications
- Connection type: copper crimp ring (ASTM F1807 style)
- Compatible sizes: commonly 1/2″ and 3/4″, the sizes used in most residential branch lines
- Tool type: manual ratcheting crimper, angled head
- Jaws: sized for the tool’s supported diameters
- Go/no-go gauge: typically included
- Cutter: not always included — check the specific kit contents
Pros
- Angled head reaches joints a straight crimper can’t approach cleanly
- Ratcheting action still locks through the full crimp cycle
- Good secondary tool for a plumber who already owns a standard crimper
Cons
- Narrower size range than full multi-head kits
- Angled design isn’t necessary for open, easy-access installations, where a standard crimper is just as fast
Best Dedicated Single-Size Tool: RIDGID Traditional Manual PEX Crimp Tool
Best for: Plumbers who prefer a lighter, single-purpose tool built around one pipe size, with a gauge built into the handle.
Why we recommend it: RIDGID’s traditional crimp tools are sold as dedicated 1/2″, 3/4″, or 1″ units (plus a combo 1/2″–3/4″ version), with a go/no-go gauge that folds into the handle and an adjustable calibration screw. A single-purpose tool is often lighter and less bulky than a multi-head kit.
Key specifications
- Connection type: copper crimp ring (ASTM F1807 style)
- Compatible sizes: one size per tool, or a 1/2″–3/4″ combo version
- Tool type: manual crimper, non-interchangeable jaw
- Go/no-go gauge: built into the handle
- Calibration: adjustable lock screw
Pros
- Lighter and more compact than multi-head kits, since there’s only one jaw geometry to house
- Built-in gauge means you’re never without a way to check a crimp
- Straightforward to calibrate
Cons
- You’ll need a separate tool for each additional size you work with
- Not the most economical choice if your jobs regularly span several tubing diameters
Best for High-Volume Professional Use: Battery-Powered PEX Crimp/Press Tool
Best for: Full-time plumbers making large numbers of connections where hand fatigue and speed genuinely affect the workday.
Why we recommend it: Battery-powered crimp and press tools are built for one-handed operation, which frees your other hand to hold and align the fitting — a real advantage overhead or in a crawlspace. Because “cordless PEX tool” covers both true crimp tools and press-fit tools on different battery platforms, this is the category where checking manufacturer compatibility matters most.
Key specifications
- Connection type: varies by model — confirm whether it crimps copper rings, presses ASTM F1807/Viega-style fittings, or both
- Compatible sizes: commonly up to 1″, depending on the die or jaw set purchased
- Tool type: battery-powered, one-handed trigger or lever operation
- Jaws/dies: interchangeable by size, sold separately in most lines
- Crimp verification: check whether the specific model displays a completion indicator or still relies on a separate go/no-go gauge
Pros
- Reduces hand fatigue significantly compared with manual ratcheting over a full day
- One-handed operation helps in overhead and tight-access work
- Consistent crimp force from the tool, rather than variable hand force
Cons
- Meaningfully higher upfront cost than any manual tool on this list
- Battery, charger, and case add weight and bulk to a tool bag
- Dies/jaws for each size are often sold separately, and not every battery platform supports every fitting brand — verify compatibility before buying
PEX Crimp Tool vs. Cinch Tool
Both systems create a permanent, code-recognized connection between PEX tubing and a barbed fitting. The difference is what compresses around the joint.
A copper crimp ring, tightened with a crimp tool, is compressed by squeezing the ring’s circumference down onto the tubing and fitting barb. Crimp tools are widely available, fittings and rings are inexpensive, and the system has a long track record in residential plumbing.
A stainless-steel cinch clamp, tightened with a cinch tool, works differently: the tool pulls a strap-style clamp tight and locks it in place, similar in concept to a hose clamp. Cinch tools are often praised for being easier to use in tight quarters, since the ratcheting head doesn’t need to fully surround the fitting the way some crimp jaws do.
Practical differences to weigh:
- Tool cost: basic tools in both systems are inexpensive; multi-size crimp kits generally cost more than a single cinch tool.
- Ease of use: cinch tools are frequently described as beginner-friendly because the clamp is visible and the ratchet won’t release until it’s fully tightened.
- Access in tight spaces: results vary by specific tool model in both categories — compact and angled versions exist for crimp tools, and standard cinch tools are already fairly low-profile.
- Removal and repair: a poorly seated crimp ring generally has to be cut off and replaced; a cinch clamp is also cut off, not reopened, when a connection needs to be redone.
- Fitting availability: copper-ring crimp fittings and stainless cinch-clamp fittings are both widely stocked, but they are not interchangeable — a fitting made for one system isn’t approved for the other.
Neither system is universally “better.” The right choice usually comes down to which fittings are already installed in the structure, or which system your supply house stocks and you’re most comfortable working with.
Related reading: PEX pipe fittings
Crimp Tool vs. Expansion Tool
An expansion tool is not another style of crimping tool — it’s a completely different connection method. Instead of compressing a ring or clamp around the outside of the tubing, an expansion tool stretches both the PEX tubing and a rigid fitting so the tubing slides over the fitting’s barb. The tubing then contracts around the fitting over the following minutes, forming the seal.
Because expansion fittings don’t rely on a compressed ring at all, an expansion tool has no crimp jaws and a crimp tool has no expander head — they simply aren’t interchangeable equipment. If your project uses expansion-style fittings, you need a tool built for that expansion system specifically, following that manufacturer’s instructions.
Can You Use a Crimp Tool on PEX-A?
It depends on the fitting and connection system approved for that tubing not on the PEX-A designation by itself. PEX-A, PEX-B, and PEX-C describe how the tubing itself is manufactured (its cross-linking process), not which connection method it must use. PEX-A tubing’s greater flexibility is exactly what makes it well suited to expansion fittings, and it’s commonly sold and marketed with expansion systems for that reason. That said, PEX-A tubing can also be paired with crimp or cinch fittings when the tubing, fitting, and ring or clamp are all rated and approved for that combination by their manufacturers.
Can You Use a Crimp Tool on PEX-B?
Yes, PEX-B tubing is commonly used with both copper-ring crimp systems and stainless-steel cinch systems, and this is the combination most homeowners will encounter in existing residential plumbing. As with any PEX system, confirm that the specific tubing, fitting, and ring or clamp are all approved for use together, and follow the fitting manufacturer’s instructions for tool and ring/clamp sizing.
What About PEX-C?
PEX-C tubing can also be used with crimp or cinch fittings, following the same rule as PEX-A and PEX-B: check that the tubing, fitting, and connection hardware are all approved for use together by their manufacturers. PEX-C is less common in whole-house installations than PEX-A or PEX-B and shows up more often in shorter runs or specific product lines, but the connection-system logic doesn’t change.
Related reading: differences between PEX-A and PEX-B
How to Choose the Best PEX Crimping Tool
1. Connection system
Decide first whether your project uses copper crimp rings or stainless cinch clamps. This determines whether you need a crimp tool or a cinch tool — it’s not a matter of picking whichever tool is cheaper or more popular.
2. Tubing sizes
Residential PEX commonly runs in 3/8″, 1/2″, 3/4″, and 1″ sizes. Check which sizes your project actually needs before buying — a single-size tool is fine for a small repair, but a whole-house repipe usually touches at least two sizes.
3. Ratcheting mechanism
A ratcheting crimper locks the jaws through the full crimp cycle and won’t release until the ring is fully compressed. This makes the crimp more consistent than trying to force a non-ratcheting tool closed by hand, and it helps prevent an incomplete crimp that looks finished but isn’t.
4. Interchangeable jaws
Interchangeable jaws matter most when a project spans multiple tubing sizes. If you only ever work with one size, a dedicated single-size tool is often lighter and simpler.
5. Go/no-go gauge
A go/no-go gauge is a simple pass/fail check: it fits over a finished crimp ring and tells you whether the ring’s diameter falls within the tool manufacturer’s acceptable range. It’s a fast way to catch an obviously bad crimp. It does not, by itself, guarantee a leak-free connection — proper pipe preparation, full fitting insertion, and correct ring placement all still matter.
6. Tool calibration
Crimp tools can go out of calibration with wear, especially with heavy use. Most manual crimpers include a calibration screw or cam; check it periodically, and always verify a few connections with the gauge on any tool that’s new to you or has seen significant use.
7. Handle design and leverage
Longer handles generally provide more leverage, which reduces the hand force needed per crimp — useful for high-volume work but sometimes harder to swing in cramped spaces. Angled or compact heads trade some leverage for better access.
8. Build quality
Materials, jaw hinge construction, and overall mechanism durability matter more the more often you’ll use the tool. A tool used for one repair a year doesn’t need the same durability as one used daily on job sites.
9. Crimp removal capability
A dedicated crimp-removal tool (sometimes called a decrimper) makes it easier to cut a bad ring off cleanly and reuse or replace the fitting without damaging the tubing. This matters more for beginners still learning proper ring placement.
10. Kit contents
A kit that bundles jaws, a cutter, a gauge, and a decrimp tool is usually better value than buying each piece separately — but only if you’ll actually use every size included. Don’t pay for a 1″ jaw you’ll never touch.
Which One Should I Buy?
Choose a manual crimp tool if:
- You make occasional PEX connections.
- Your fittings use copper crimp rings.
- You want a straightforward, lower-cost solution.
Choose a cinch tool if:
- Your fittings use stainless-steel cinch clamps.
- You value easier access in confined spaces.
- You prefer being able to visually inspect the clamp after installation.
Consider a professional or battery-powered tool if:
- You make large numbers of connections regularly.
- Speed and reduced hand fatigue affect your workday.
- The added cost is justified by frequency of use.
Choose an expansion tool if:
- Your tubing and fittings use an approved expansion system.
- You are specifically working with expansion-style fittings, not crimp or cinch fittings.
How to Use a PEX Crimping Tool
- Shut off the water supply to the section you’re working on.
- Cut the PEX tubing squarely using a PEX-rated cutter.
- Slide the correct-size crimp ring onto the tubing before inserting the fitting.
- Insert the fitting fully into the tubing until the tubing reaches the fitting’s shoulder.
- Position the crimp ring according to the fitting and tool manufacturer’s instructions — typically a specific distance from the tubing’s cut end.
- Place the correctly sized jaw over the ring, centered as specified by the manufacturer.
- Squeeze the tool through the full crimp cycle until the ratchet releases.
- Check the connection with a go/no-go gauge or the verification method specified for your tool and ring system.
- Pressure-test the completed system before closing up walls, ceilings, or other inaccessible areas.
Read our details guide on: How to Use a PEX Crimping Tool
Common PEX Crimping Mistakes to Avoid
A PEX connection can look properly crimped and still leak if the wrong components, tools, or installation steps are used. Avoid these common mistakes before turning on the water or closing up a wall.
Using the Wrong Connection System
Do not use a crimp tool on a connection designed for cinch clamps, or try to install a copper-ring crimp connection with a cinch tool. The connection method must match the fitting and hardware.
Using the Wrong Jaw Size
A jaw designed for one tubing diameter will not correctly compress a crimp ring for another size. Always use the jaw that matches the tubing and crimp ring size.
Mixing Incompatible Components
Make sure the PEX tubing, fitting, and crimp ring or clamp are approved for use together. Do not assume that components from different systems are automatically compatible.
Cutting PEX Unevenly
An angled, crushed, or rough pipe end can prevent the fitting from seating correctly. Make a clean, square cut with a proper PEX tubing cutter before making the connection.
Failing to Insert the Fitting Fully
Push the fitting fully into the tubing until it reaches the specified shoulder or insertion point. Crimping a fitting that is not properly seated can result in a leaking connection.
Placing the Ring Incorrectly
Position the crimp ring according to the fitting manufacturer’s instructions. A ring that is too far forward or too far back may not create the required connection.
Using Damaged or Poorly Maintained Tools
Worn jaws, damaged components, or an improperly adjusted crimper can produce a connection that looks compressed but does not meet the required specifications.
Skipping Connection Inspection
Inspect every connection after installation. For copper-ring crimps, use a go/no-go gauge when the system specifies one. Follow the manufacturer’s required verification method for other systems.
Assuming a Gauge Check Means the Joint Is Fully Tested
A go/no-go gauge checks the crimp ring’s dimensions. It does not prove that the completed plumbing system will hold pressure. Connection inspection and pressure testing are separate steps.
Closing Walls Before Pressure Testing
Do not cover a new PEX installation before testing it. Finding a leak before drywall or other finishes are installed is much easier and cheaper than repairing a hidden leak later.
The safest workflow is simple: make the connection correctly, inspect it, pressure-test the plumbing system according to the applicable instructions and requirements, and only then close walls or ceilings.
Which PEX Crimping Tool Should You Buy?
The best PEX crimping tool depends on your connection system, pipe sizes, workspace, and how often you plan to make connections. Here are the top picks for different types of projects.
IWISS iCrimp F1807 Kit
The most complete choice for typical DIY projects and small remodels, especially when you need to work with multiple common PEX sizes.
IWISS Ratcheting PEX Cinch Tool
A simple, affordable option for projects that use stainless-steel cinch clamps instead of copper crimp rings.
Apollo PEX Multi-Head Crimp Tool
A versatile choice for professional or multi-size work where you need strong leverage and different crimp sizes.
IWISS iCrimp Angle Head Kit
A practical option when standard crimp tools are difficult to position around restricted-access joints.
RIDGID Traditional Manual Crimp Tool
A good fit when you regularly work with one PEX size and want a dedicated manual crimping tool.
Battery-Powered PEX Crimp/Press Tool
Best suited to professionals making a high number of connections where speed and reduced hand fatigue justify the higher cost.
Before You Buy: Check Compatibility
Don’t choose a PEX tool based on brand or price alone. Verify that your PEX tubing, fitting, crimp ring or cinch clamp, and tool are designed to work together.
Also follow the fitting manufacturer’s instructions for ring or clamp placement and the correct crimping procedure. Getting the connection system and installation method right matters more to a leak-free joint than simply choosing one brand over another.
Frequently Asked Questions
Have questions about choosing or using a PEX crimping tool? Find quick answers about crimp tools, cinch tools, PEX sizes, fittings, gauges, and connection methods.
What is the best crimping tool for PEX?
There isn’t one universal best PEX crimping tool because the right choice depends on your connection system, pipe sizes, and project size. For most DIYers using copper crimp rings across several common PEX sizes, an all-in-one kit such as the IWISS iCrimp F1807 is a practical choice because it combines the crimper with useful accessories.
Is a PEX crimp tool better than a cinch tool?
Neither is inherently better. They are designed for different PEX connection systems. A crimp tool compresses a copper crimp ring, while a cinch tool tightens a stainless-steel cinch clamp. Check your existing fittings or the fitting manufacturer’s specifications before choosing a tool.
Can you use a crimp tool on PEX-A?
Sometimes. PEX-A is commonly used with expansion fittings because of its flexibility, but it can also be used with crimp or cinch systems when the specific tubing, fitting, and ring or clamp are approved for that combination. Always follow the tubing and fitting manufacturer’s compatibility requirements.
What is the best PEX crimp tool for DIY?
For most DIY projects, a multi-size manual PEX crimp tool kit with a pipe cutter and go/no-go gauge is a practical option. A kit such as the IWISS iCrimp F1807 can be useful when you need to work with multiple common PEX sizes without purchasing several separate tools.
What size PEX crimp tool do I need?
Choose a PEX crimp tool or jaw that matches the outside diameter of your tubing and the crimp-ring system you are using. Common residential sizes include 3/8 inch, 1/2 inch, 3/4 inch, and 1 inch. If your project uses multiple sizes, a multi-size kit or interchangeable-head tool can be more convenient than a single-size crimper.
Do PEX crimp tools work with all fittings?
No. A PEX crimp tool is designed specifically for compatible copper crimp-ring fittings. It should not be used to compress a stainless cinch clamp or to make an expansion-style connection. Identify the connection system used by your fitting before selecting a tool.
Do I need a go/no-go gauge for PEX?
A go/no-go gauge is strongly recommended when the tool and connection system call for one. It provides a quick way to check whether a completed crimp falls within the tool manufacturer’s specified range. This can help identify an improperly made connection before it is concealed behind a wall or ceiling.
Can you reuse a PEX crimp ring?
No. A copper PEX crimp ring is permanently deformed when it is compressed and should not be reused. If you need to redo a connection, remove the old ring and install a new compatible crimp ring according to the fitting manufacturer’s instructions.
Can a PEX crimp be removed?
Yes. A PEX crimp can be removed with a suitable crimp-removal or decrimping tool. Some PEX crimp kits include a decrimp tool for this purpose. When removing a connection, take care not to damage the PEX tubing if you plan to reuse that section.
How do you know if a PEX crimp is good?
Follow the inspection method specified by your tool and fitting manufacturer. This typically includes checking that the tubing is fully inserted, the ring is correctly positioned, and the crimp meets the required gauge or verification standard. A proper gauge check is useful, but the completed plumbing system should also be pressure tested before walls or other finished surfaces are closed.
Are expensive PEX crimp tools worth it?
It depends on how often you will use the tool. A battery-powered PEX tool can save time and reduce hand fatigue when making many connections, which can be valuable for professional plumbers. For an occasional homeowner repair, however, a quality manual crimp tool can provide the required connection at a much lower cost.
What is the difference between a PEX crimp tool and expansion tool?
A PEX crimp tool compresses a copper ring around compatible PEX tubing and a fitting. An expansion tool temporarily expands the tubing so an expansion-style fitting can be inserted. These are different connection systems, so crimp tools and expansion tools are not interchangeable.